Spelunky 2 Font Editor
A desktop app used to create Spelunky 2 sprite fonts.
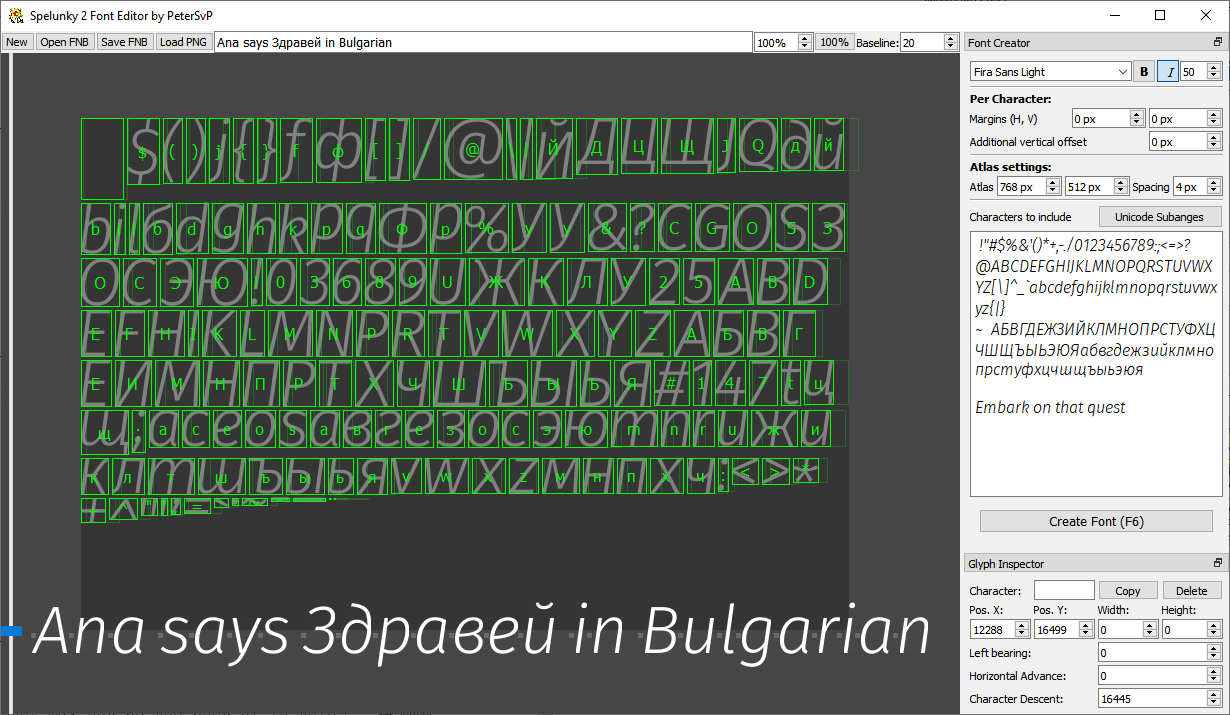
The tool operates on the FNB font files from Spelunky 2 and their respective texture atlasses, however only as PNG. With this tool you can either create font using any system-installed font (bitmap, TTF, OTF, whatever Qt supports on your OS), or load manually designed font atlas and manually define the font glyphs and their properties.
Download for Windows
To download pre-built package for Windows go to the Releases page. No pre-built package available for Linux yet.
How to use?
The app should be very straight-forward. You have two options:
- Automatically create sprite font from installed system font (TTF, OTF), or
- Manually design your atlas and define your font by hand.
Some very basic controls:
- Pan view - drag with middle mouse button
- Zoom view - Mouse scroll wheel.
- Click on glyph rectangle - select that glyph
- Right mouse click - finds and selects, or creates new glyph.
- Arrow keys + shift, ctrl, alt - edit selected glyph, read below.
Creating sprite font from TTF/OTF
- Get the fonts you need, and install them to your system.
-
Start Spelunky 2 Font Editor. Focus your attention to the Font Creator tab.
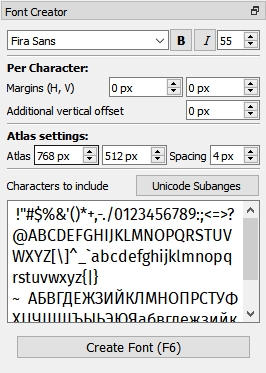
- Fill in some sample text into the text field on the top toolbar of the app. This will be used for testing how your font behaves.
- Select the font family and the font size. Recommended font size for Spelunky 2 is 40 to 60.
- Use the
Unicode Subrangesbutton or manually type the characters to include in your font. - Hit
Create Font (F6)and observe the results. -
Tweak the Atlas Settings and Per Character properties and hit
Create Font (F6)until you are satisfied with the result. Ensure that all green rectangles are in the boundaries or your texture (the darker rectangle).
Manually creating font and editing glyphs
Spelunky 2 Font Editor allows you to manually define glyphs and edit glyphs as you like, or add new characters to fonts.
- Draw yourself an atlas with glyphs.
- Start Spelunky 2 Font Editor. Hit
Load PNGbutton and feed in your texture atlas. - Right click anywhere to search glyph or define new one. Popup will ask you to input a single character. If such character already exists in the font, it will be automatically selected for you. If such character does not exist, a character definition will be created for you.
- Left-click on a green rectangle to select that glyph.
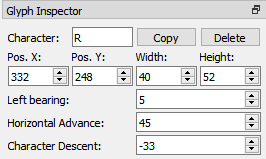
-
Edit selected glyph properties into the Glyph Inspector.
- To feel the power, here are all the keyboard controls:
- Use the
arrow keysto move the bounding box of the glyph, Ctrl+Arrowsto resize the bounding box,Alt+Arrowsto edit the left bearing and descent andCtrl+Alt+Arrowsto edit horizontal advance.- Hold
Shiftto make nudging stronger.
- Use the
-
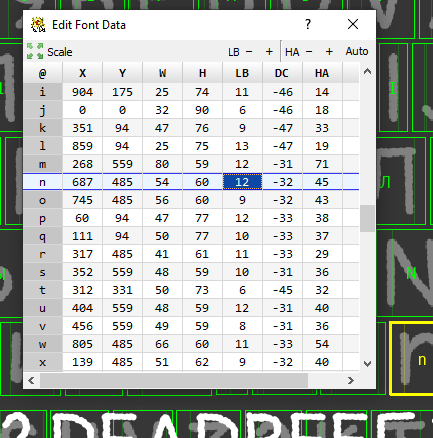
Or use the Table Font Data Editor.
-
DO NOT FORGET TO DEFINE THE HORIZONTAL ADVANCEMENT, IT’s CRITICAL! Otherwise ALL GLYPHS WILL LAND IN SAME PLACE!
-
DO NOT FORGET TO DEFINE THE SPACE CHARACTER! IT’s CRITICAL!
- During editing, save your projects as FNB. I encourage you to treat FNB files as project files!
Getting your fonts into the game
- When you are ready, hit the
Save FNB. If you select a folder within Modlunky 2 mod pack and save your FNB file intoData/Fontsof said pack, this app will automatically place the PNG file intoData/Texturesfor you. - In order to make your fonts work in the game, they must be named
fontfirasans.fnbfor the Main Menu and Journal texts andfontyorkten.fnbfor Journal labels and other places. Thefontmono.fnbis used at the seed dialog. There is also unused font namedfontdebug.fnb. - While the original textures are in DDS format, Playlunky and Modlunky 2 can load PNG files for convenience, and PNG files are usually easier to manipulate. This app cannot load DDS files nor can export DDS files. Convert to PNG first.
- Feel free to edit your PNG texture in any way you like. You are encouraged to pass this PNG through some sharpening filter, because Spelunky 2 does not natively render texts alpha-blended properly! Also Spelunky 2 does not support colored font atlasses (this can hopefully be fixed by a shader mod).
- IF YOUR FONT IS WRONGLY ALIGNED OR DON’T RENDER AT ALL in the game, play with the
Baselinesetting in the main window’s top toolbar. Values between 25-40 will work the best. - IF YOUR FONT IS TOO SMALL OR TOO BIG, Edit the font size. If you are making your own font from custom atlas, rescale the atlas e.g. in Photoshop, then use the Table Editor’s Scale feature to fix all the glyphs. Better use exact sizes, e.g. 2x/4x or 0.5x.
- IF ALL GLYHPS OF YOUR FONT APPEARS IN SINGLE PLACE, and you created the font from your custom atlas, read the Manually creating font and editing glyphs section to understand why.
- Note that some fonts just don’t like the font system in Spelunky 2 and key/button icons will always be wrongly aligned.
How to build from source?
- Get Qt open-source and Qt Creator
- Open the
FNBTool.proin Qt Creator. - Enjoy! So far, only
qmakeis supported.